
Hey! The group returns life, so we look at the lessons at the request of the participants! Let's start with a wolf.
1
2
3
4
5
6
7
8
9
10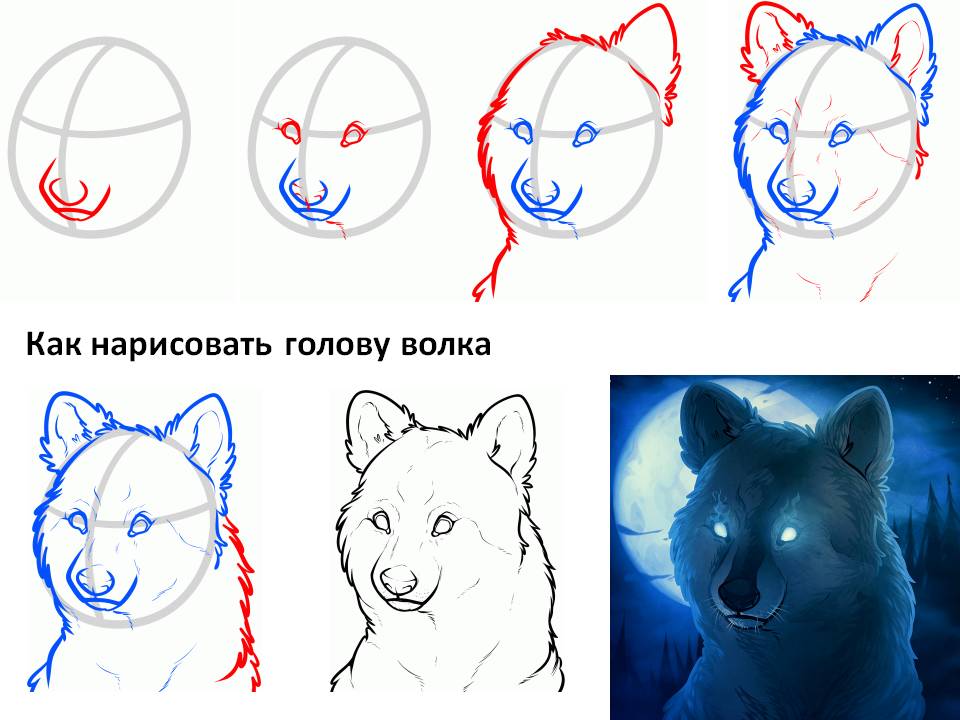
11
12
13
14
15
16
17
18
19
20
21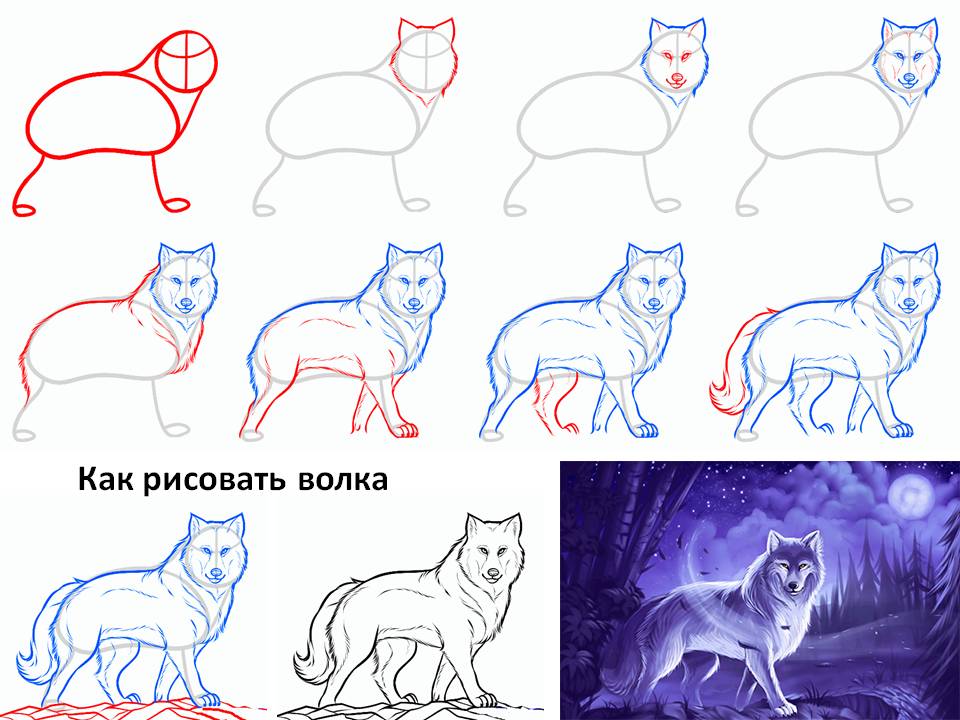
Draw a wolf. Our wolf raised a head - he is how to go to the moon.
Draw a common wolf contour

To make it easier for you to draw a wolf, you can share your future drawing into squares. Such marking will help you correctly draw primary contours.
Draw at the beginning of the contours of the body and the circle for the wolf head. Then add a few strokes for the wolf paw and move to the next step.
Add details on the drawing of the wolf

At this stage, we draw a wolf's approximate contour of its body and tail. But first draw the paws of the wolf. The front paws will draw quite easily, but the rear is a bit more complicated. They always bent at the wolf and something like cat.
How to draw a wolf head

Since the common outline of the wolf, we have already drawn. You can remove the preliminary markup and start drawing the wolf's head, but first it is just an approximate outline of the wolf head without a detailed drawing. First draw the contours of the ears. Then draw the contour of the muzzle. Try to do this item as accurate as possible so that the wolf is not like your fox or dog.
Figure olive wolf in detail

In any drawing, including the animal, the audience, first of all, pay attention to the head or face if it is a drawing of a person. Therefore, it is necessary to draw a wolf so that it can be more accurate to convey its predatory expression so that instead of the wolf it does not work out.
First, remove the unnecessary contours from the picture of the wolf head and draw the nose. Now you can draw your eyes, add other small details.
In general, it is not so difficult to draw a wolf in stages and almost at this step, the overall drawing of the wolf will be completely finished. You will only choose, draw it further with a simple pencil or paint with paints or colored pencils.
How to draw a wolf. Draw wool

If you decide to draw a wolf only with a pencil, then use my shadow application scheme.
The most difficult thing to draw wool wolf. To do this, in contours, apply numerous fine pencil strokes as on my drawing. Try not to paint the wolf skin with one color. The shadows give the wolf volume and besides, in life, the wool's wool has different shades, especially during molting.
Figure Wolf on Tablet

Coloring the drawing of a wolf with colored pencils and the more paints are not easy. Not only is it very difficult to pick up needed colorSo the color of the wolf has different shades. A dark band passes on the back. Stripes with a dark tint will meet on the neck and on the belly of the wolf. The bridge and forehead of the wolf should also be darker.
To emphasize that this is a wolf, and not a dog is to use in the drawing plot. For example, draw a wolf surrounded by hunting dogs, or draw a wolf on the forest glade. Then small inaccuracies will not be so rushing in the eye and it will understand that this is a drawing of a wolf.
Our task today is to understand how to draw a wolf pencil, evil and terrible gray, which in piglets knows. And it is necessary to do it so as to understand his nature.
But first I will define! Wolf, who is it for us, the hero of fairy tales or a predatory beast, living in the forest? Accordingly, choosing its role, we will portray this character. That is what I'm going to teach my son.
Find character character
For children, the wolf seems often as a character from the cartoon "Capital", "there was a dog", "wolves and sheep" and others. Therefore, I must introduce my son with what role this predator performs, living in its natural conditions.So we start working to portray the wolf pencil in stages. We read books, mostly encyclopedia, carefully consider pictures together, which are there. We discuss them together. We learn about the nature of this Sanitary Forest.
We are interested to get as much information as possible. This time is not in vain and for my son, and for me. We are interested in communicating. But we also get acquainted with the world around us. And finally, we understand how we want to draw a wolf in a phased pencil. Start.
Work on preparation
All that we learned helps to choose a suitable drawing, which will be the basis of our work, we took it for drawing. Our beast is calm, knowing that nothing and no one threatens him, because he is a threat!He is a predator. He has a calm, but attentive glance, directed somewhere far, probably to follow the animals of the forests, which are still moment, and can become prey, as well as to foresee the appearance of a hunter - the only threat of wolves.
So how to draw a wolf gradually? We prepare everything you need:
- Paper;
- Colour pencils;
- Eraser;
- Simple pencil.

Why do we need color, if you are familiar when the Wolf is black and gray? And his predatory eyes, which is so branded bright green. Sometimes they paint an open mouth, for this you need a red color. The inside of a white-pink beast. And the tip of the tail in some representatives of this family is white. Therefore, we will use this whole set.
Portrait of a brutal portrait
7 steps of the phased painting of the wolf. From simple lines we will reach to get the image of the beast.Step 1
Draw a circle. And under it the figure, similar to the shape of the egg. She is a bit aside. And the narrow part of it further from the circle.
Step 2.
We connect both figures with a concave line on the right side. 4 lines depart from the lower figure, they will have the beast legs.
Step 3.
Perhaps a child needs some help here, because such details on the face, like nose and ears drawn.
Step 4.
We depict the neck, eyes and front paws. Much lighter than kids and beginners to portray a phased wolf pencil. So every detail is drawn with a picture for drawing. And therefore is depicted more accurately.
Step 5.
We pay attention to the hind legs. We remove all the extra details. The beast drawn by us is already becoming more similar to those pictures that I looked through the baby before the start of work.![]()
Step 6.
Moving step by step, we did not notice how almost everything did. It remains to draw the tip of the tail, which is visible, circling the image, not forgetting that the Mother has a strong neck with a clutch, short wool, which will turn in all directions and strong paws. Drawing with a pencil for beginners looks quite worthy.
Step 7.
Painting. Here we are not only our beast by the paints, but also give it naturalness. To be able to fine with the sample. You need to give any image of your character. It should be clearly visible on posture and face expression.We got a great picture. And my son already know how to draw a wolf, a predatory and beautiful beast.

And some more options:
Moon-going:

And cartoon wolf: 
The wolf is a dangerous predator that for some reason gained great popularity on the Internet. According to the drawing method, it is most like a dog, but there are specific features and features. The wolf has a characteristic appearance, regardless of the specific type. He also often has a very thick and magnificent fur needed in order to survive in harsh conditions.
As in other lessons, we will consider the question of how to draw a wolf using step-by-step drawings and detailed explanations. This will allow anyone who wants to master this material. Thanks to the prompts and accurate explanations, the child without adults can understand what the wolf has been depicted independently. Even if you have no experience in drawing, try to go through each stage to get a really good result.
Before you start, prepare the place of work. You need a table on which there will be nothing superfluous. It is better to take a few pencils varying degrees Stiffness. You will also need an eraser and, if you want to get a color image as a result, various tools for coloring. The usual color pencils are ideal. However, you can use paints, pastel and much more.
How to draw a wolf gradually
In previous lessons, we told why it is important to start any drawing from supporting figures. Let's briefly explain again:
- help correctly build an image;
- improve the quality of work;
- allow you to reduce the number of corrections;
- competently build up perspective;
- help to observe proportions.
If you can draw without reference points, it is recommended to use them at the training stage. You will immediately notice the difference. Moreover, drawing "out of the head" is very difficult to portray everything right from the first time. Such auxiliary elements will noticeably make it easier for the artist.
Main contours
We will depict a wolf, which runs to meet us and turns a little left. This animal has a rather wide muzzle, so the first reference oval must be depicted with a horizontal expansion. Keep in mind that you should not do it too wide. It is enough just to chop up from above and below.
Then put the center in the center at the bottom. It will be the right middle of the second reference circle. It should be about 3-4 times less than the previous option. With it, it will be marked by the border of the animal grazing and the correct perspective is created. Also at this stage you can begin to portray the body of the animal. 
Since we consider the question of how to draw a wolf pencil in the future, you should draw a small curve leaning to the right. It should be flexing in the middle and be about one straight at the ends. The bending itself is quite gently and resembles a small bulge. Thus denotes the bending of the body of the animal.
Mord and Torchishche

Now you can add a little detail to the face and start painting the body of the wolf. Initially draw the contours of the ears. They have the shape of triangles aimed at different directions and a little resemble cats, but more elongated and sharp. To do this, you can spend direct right from the center of the reference large circle to the right, and then the arcuate line for the right upper edge. Left ear is drawn with overlapping. Make sure that they are at one height.
From the middle of a large reference circle, start drawing the mouth of the animal. To do this, spend a slightly curved line to the lower boundary of a small reference circle, and then complete the form by following the arc. You can also add a nose in the form of a triangle with rounded corners. He must occupy about one fourth of the entire small reference circle. Eyes can be added with small drops located just above the grazing. In one of the following stages, we detail them.
I remember when I learned to draw, it was the wolf that was heavier than everything. He always turned out to look like a dog, then at all on some unknown animal. It is worth noting that then there was no particular internet and had to draw more from the head or on books. But now I can confidently say that thanks to the lessons you can learn to portray everything that your soul. Subscribe to our lessons, and you will be able to become a real master of fine art.

Now you can designate the body. It is best to do this by drawing two reference circles: one for the front belt and one for the rear. Since we are talking about how to draw a woman with a pencil in gradually, even such things will be considered. The right limit of the first circle should accounted for exactly on the middle of the support line for the body. Second circle Start drawing on the height of the intersection of the circle for the muzzle and the line curve. It should be slightly more and located below the first.
Fur and new reference points

Since the wolf has a lot of fur, he will hang out in some places. If you know how to draw folds, you will not have any special difficulties with the drawing of this stage. Initially, it is necessary to draw the fur around the animal muzzle. Start it to do on the left side where it is less and finished right. Consider that it is not necessary to draw on top of the fur, as it falls under the influence of gravity.
You can also slightly detail your eyes. Earlier, we drew only the upper boundaries of the drawing, now add the bottom. You must have a sort of ellipse with corners or parallelepiped with rounded corners. Something similar you could see in the article dedicated to.
Since today we consider how to draw a wolf for beginners, let's draw a few more reference circles. This time for the paw of the animal. They will accountet the joints of the wolf. From the lower right border of the pasta, go down to the lower boundary of the large circle of the body and draw a small circle. The second should be depicted a little right. The latter is also located on the right, but does not go beyond the current boundaries of the picture.
Paws

Initially, you should depict straight contours for the paw. To do this, spend one direct from the upper reference circle to the left circle, as well as the curve to the central circle. For the right contour line should fall from the big right circumference. Next need to be spent vertical lines From the reference circles down to rather indicate the position of the paw in space. Here, add a couple of strokes to the ears, making them more expressive.

Next, you need to add an external contour from the paw. They have a very specific structure. The width of the paws should not exceed the regions of the reference circles. Spend the lines parallel to the curve drawn in the previous step. For one of the paws, you can immediately draw claws - it will facilitate the task in the future. Since we are talking about how to draw a wolf pencil for beginners, I recommend repeating all the contours from the picture. Otherwise, the result may be implausible.
Detailing
![]()
The last stage in the drawing of the wolf is detailing. It is necessary to add even more lines denoting the animal fur. First of all, it is necessary to add a line from grazing to the center of the muzzle. You can also trust a little fur in the ears. Supporting circles are better to convert and add it uneven contours. Some parallel curves are suitable for each site. In addition, draw a wax tail behind the paws.

Let's add even more auxiliary lines so that the wolf turns out even more realistic. First of all, you should add fur lines on your head. Let them, they resemble a zigzag tick. Also on the face you can make a kind of eyebrows, using uneven contours. It is better to detail the mouth and nose line. At the end erase all the reference lines. If you want, you can paint the result.
How to draw a wolf
This time we draw a wolf, which will be on the moon. In principle, this option is even easier than the previous one and even children can cope with them. So if you want to teach your child to draw this animal, it is better to offer him this option. Moreover, with the help of these consecutive steps, you can understand how to draw a wolf on the side, which is also important to learn how to do.
Supported contours

Start drawing from the definition of the drawing boundaries. In the upper left corner, specify the point where the animal face will be harvested, in the right bottom - the back paw. It will also determine the location of the Earth. It is necessary that in the future to observe all the proportions and correctly understand how to draw a wolf gradually for beginners.
So, a little retreat from the upper point down and draw a small circle. It will be the basis for the muzzle of our wolf. Then go down a little down and right. Picture horizontal ellipse, in shape resembling beahs. He must narrow on the right and expand with the left. It will be a torso wolf.
Next designate your ear. It should have the shape of the floor of the ellipse and is directed to the right. Then connect with curved lines torso and head. It turns out a practically a full wolf. Next, it is necessary to designate the mouth of the animal. For this, two lines are conducted from the reference circle and are connected using a curve. Draw a passage.
By the way, since the wolves most often live in the forest, then the ability to draw trees is truly important. On our site there is, which is dedicated to this technique. Pass it and learn to portray excellent backgrounds.
After that, designate the base of the animal tail. It should come out of the upper border of the body around the arc to the right, and then drop vertically down. You should also depict the contours of the paw of the animal. Earlier it was noted that the wolves have a rather specific shape of the paw, so it is necessary to adhere to the figure. At the end, add several circles in contact with the surface of the Earth.
Detailing

You have a ready-made blank, which must be converted to the finished wolf. It is best to focus on the layout so that you have a smooth proportion. Then you can try to independently portray this animal using similar outline, but for now it is better to repeat everything that is in the picture.
Distribute the face and the upper part of the body. Add some fur on the neck of the animal. Also detail the ears by adding them the external borders and irregularities. Indicate the eye line, draw the nose-triangle and add a pair of fangs. This will make the drawing much more realistic and attractive.


- Paws must slightly drink out.
- From the torso they go under a certain angle back.
- Have a characteristic bone.
- The width of the paw is constantly narrowed.
- Fur germinates downstairs.
In general, it is better to also use the specified drawings and try to draw everything with sufficient accuracy. This will later create something "your".


In the end, designate the rear paws and the tail, following the same principles. This should be enough to understand how to draw a woman with a pencil in stages for beginners, however, you can complement the work in detail to add a life image. For this, it is necessary, first of all, draw the fold folds.

Most of them will be attended by neck, as our animal raises her head to the top to swell. You should also depict several zigzag lines in those places where the paws are connected to the torso. Add some ligaments on your feet using conventional straight lines. Make sure that the lines do not look fake.
At the end you can decorate the drawing, as I did.
In principle, these knowledge is enough to understand how to draw a wolf for children. However, if you have any questions, feel free to ask them in the comments. I will definitely answer them and help you understand everything. Here you can leave your comments that will be taken into account or processed. Do not forget to subscribe to updates, so as not to miss something really important. Until!
The wolf is a dangerous predator, including for a person. But he also possesses a number of outstanding traits, for which the wolf loved to people. About his courage and loyalty go legends. Therefore, often the image of the wolf is used in films, cartoons and books. Also, you can see pictures, posters and even tattoos with various images of the wolf. Today we dedicate our lesson the issue " how to draw a wolf with a pencil? "The lesson will be very detailed and phased to draw the wolf could even children easily and simply.
Tools and materials:
- White sheet of paper.
- Solid simple pencil.
- Eraser.
Stages of work:
Photo 1. We begin to build a wolf face with the most outstanding part of the nose. We look at his shape with straight lines:

Photo 2. Draw the shape of the tip of the nose, as well as the separation line between the mouth and nostrils. The wolf will be depicted in the profile not fully, therefore it will be a little visible its left part. His mouth is drawn closed:

Photo 3. At the bottom draw a part of his neck, and from above - part of the face of the animal:

Photo 4. We plan the location of the left eye and ear, which will be in the background:


Photo 6. We will add a second ear that is deployed to the Father. Also draw a rounded shape of a wolf portrait:

Photo 7. We specify the edge of the muzzle, strengthening our pencil. Drawing wool bends:

Photo 8. We begin to apply strokes from the nose. This part will be the darkest and standing in the figure. Strokes make in the direction of the growth of hairs:

Photo 9. We continue to apply tone. We highlight the eyes with a pencil, because the eyes and nose are similar in their tone:

Photo 10. We begin to draw wool from the left side, because the background part sets the tone of the elements in front:

Photo 11. In the same pace, we continue to draw the wool of the beast, smoothly moving to the right side:

Photo 12. With effold the contrast of the drawing on the left side with a larger pressure on the pencil:


